Programming the ATmega328P
- Select the correct board in the Arduino IDE by going to Tools > Board and selecting “ATmega328 on a breadboard (8 MHz internal clock)”
- Select the correct programmer in the Arduino IDE by going to Tools > Programmer and selecting “Arduino as ISP”
How do I program my atmega 328p?
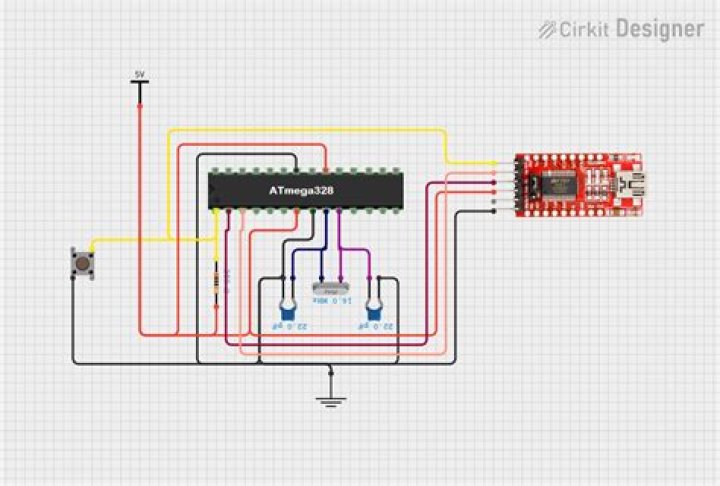
Upload the ArduinoISP sketch onto your Arduino board. (You’ll need to select the board and serial port from the Tools menu that correspond to your board.) Wire up the Arduino board and microcontroller as shown in the diagram to the right. Select “Arduino Duemilanove or Nano w/ ATmega328” from the Tools > Board menu.
How do I program ATmega328 without Arduino bootloader?
There are two ways of doing it.
- You can use arduino board with the IC. Program the IC and then take it out and use it in your circuit.
- If you don’t have arduino board, you can use other programmers like USBasp to program your Atmega328p .
What is difference between ATmega328 and ATmega328P?
There is no major functional difference between them except for power. This microcontrollers are mostly used in Arduino’s. The Atmega 328 function the same like Atmega 328p but the 328p has very low power consumption using the ATMEL’s PicoPower Features. Hence P stands for PicoPower.
What is difference between ATmega328 and ATmega328p?
How do you code ATmega328P?
From the Tools menu, under Board:, select Arduino Nano. Then, in Tools > Programmer: select USBasp. From the Tools menu, under Programmer:, select USBasp. Now, to flash the Arduino bootloader onto the ATmega328p, we first need to connect the USB ASP programmer to the Maker Pro robot PCB.
How do you code ATmega328p?
How do you burn ATmega328p?
Burning the Bootloader in 5 simple steps:
- Step 1 – Installing Mini-core. Install ‘Mini-core’ a hardware package which adds support for a range of ATmega devices in the Arduino IDE.
- Step 2 – Installing ArduinoISP.
- Step 3 – Wiring Up.
- Step 4 – Select your device, crystal and programmer.
- Step 5 – Burn the Bootloader.
What is ATmega328P how it is different from microprocessor?
The ATmega328 is a single-chip microcontroller created by Atmel in the megaAVR family (later Microchip Technology acquired Atmel in 2016). It has a modified Harvard architecture 8-bit RISC processor core….Features.
| Parameter | Value |
|---|---|
| Maximum CPU speed | 20 MHz |
| Performance | 20 MIPS at 20 MHz |
| Flash memory | 32 KB |
| SRAM | 2 KB |
What is P in ATmega328P?
The Arduino Uno uses the Atmel manufacturer company’s Atmega328p model microcontroller chip. For interest sake the 32 stands for the max program size it can store (32K), the 8 for the processing speed (8 bits) and the p for picoPower (very low power).
How to program the ATmega328P chip with Arduino IDE?
To be able to use the Arduino IDE to program the chip, we need to burn the bootloader to the Atmega chip. At this step, we need an Arduino UNO board we will use it as a programmer by connecting the MOSI, MISO, SCK pins between the ATmega328p chip and the Arduino UNO board.
What is the internal clock speed of the ATmega328P microcontroller?
As stated in the name, the configuration we just loaded into the Arduino IDE (ATmega328 on a breadboard (8 MHz internal clock)), assumes that the internal clock speed of the ATmega328P is set to 8MHz. While 8MHz is one of the clock speeds of the microcontroller, it is likely not operating at that speed.
How do I install the ATmega328P on a breadboard?
Place the ATmega328P in the middle of the breadboard with the rows of pins straddling the centerline as shown below. Connect pin 7 (VCC) to the power rail and pin 7 (GND) to the ground rail. These serve as the power and ground to the ATmega328P.
Why do we keep the GND high on the ATmega328P?
So we keep it HIGH to make it disabled. Usually, the ATmega328P chip works on a 16MHz crystal oscillator placed on the pins 9 and 10 but in order to make it oscillate it needs two 22Picofarad capacitors connected to the GND.