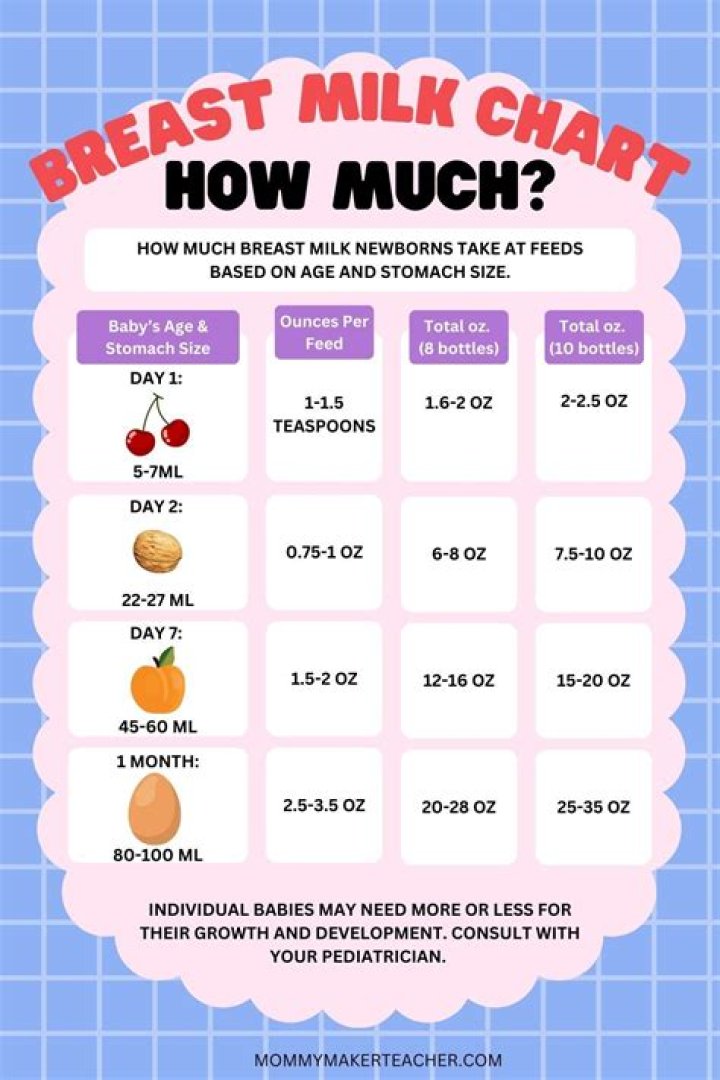
A good buffer size for recording is 128 samples, but you can also get away with raising the buffer size up to 256 samples without being able to detect much latency in the signal. You can also decrease the buffer size below 128, but then some plugins and effects may not run in real time.
What is output buffer size?
Buffer size is the amount of time it takes for your computer to process any incoming audio signal. Setting an appropriate buffer size will improve your DAW’s consistency and reduce your frustration with error messages.
What is buffer size Ableton Live?
All audio in Live is processed in defined parcels of time, called an audio buffer. This helps to minimize dropouts or glitches, as the buffer allows time for all events to be smoothed out. The buffer size is defined in Live’s audio preferences. The bigger the buffer size, the bigger the latency.
How do I change the buffer size?
Adjusting the Buffer Size
- Select Devices > Device Setup.
- In the Device Setup dialog, select the driver from the devices list.
- Click Control Panel.
- Windows: Adjust the buffer size in the driver dialog that opens.
- Mac OS: Adjust the buffer size in the CoreAudio Device Settings dialog.
How do I reduce buffer size?
Adjust buffer size in Studio One by following these steps:
- Choose Song, select Song Setup, and then click Preferences in the lower left-hand corner of the window.
- In the Audio Setup tab, simply choose your buffer size from the drop-down window labeled Device Block Size.
What is input and output buffer size?
What buffer size do, is it determines how fast the computer processor can handle the input and output information. With lower buffer size, the computer processor handles the information very quickly, it takes more system resources and it’s pretty strenuous on the computer processor.
Should I use custom buffer size?
No. It’s unnecessary, and many “guides” list custom numbers here but don’t actually know what it’s used to correct/compensate for. Generally unless one of the Devs tells you to use a custom buffer, don’t.
How to change the buffer size in Ableton?
Re: Buffer size in Ableton. Try to change the buffer size with the slider in the ASIO4ALL window, not in Ableton Live. As far as I remember you can not change it in Live when you’re using ASIO4ALL. A buffer size of 256 samples should be possible with your machine.
What is the recommended buffer size for live audio?
We recommend using a buffer size of one of the following: 128, 256, 512 or 1024 samples. It’s possible to set the Buffer size in Live’s preferences → Audio Tab, however depending on your interface, you might need to click on ‘Hardware Settings’ to make the adjustment in the audio interface preferences.
How does the buffer size affect latency?
The buffer size is defined in Live’s audio preferences. The bigger the buffer size, the bigger the latency. In addition, the type of audio driver and the interface you use affect latency. 2. Device/Plug-in related latency Certain Live and Max for live devices, as well as certain plug-ins and processes can add latency.
How do I change the size of the ASIO4ALL buffer?
Try to change the buffer size with the slider in the ASIO4ALL window, not in Ableton Live. As far as I remember you can not change it in Live when you’re using ASIO4ALL. A buffer size of 256 samples should be possible with your machine.