Holes or gaps in a mesh If this error is overlooked, the printer will not be able to correctly print the design. Which is why it’s crucial to make the design in STL file manifold or, as it’s also known, watertight – which means that there mustn’t be any gaps on the surface.
What can you do with Meshmixer?
Autodesk meshmixer is a fantastic free software for creating and manipulating 3D files for 3D printing. Whether you need to clean up a 3D scan, do some 3D printing or design an object, meshmixer can help.
How do you fill gaps in PLA 3D prints?
The process is as follows:
- Find all the seams and gaps in your 3D print.
- Take some filler and apply it on the seams.
- Use your finger to run it along all the edges and minor gaps in your 3D print.
- Keep on applying the filler until the seam is completely filled.
How do you fill hollow models?
You could fill it with sand, then seal the hole, that’s just about the cheapest most efficient way. Or if you need it to be even heavier, you could fill it with lead shot (for shotgun shells). If the drain hole in your model are the typical ones (2-3mm), you can buy #9 or #10 lead-shot really cheap.
What are STL errors?
An STL file is a file format that can be read correctly by a 3D printer. The tutorial below explains what type of STL errors can occur and why they occur. Including bad edges, near bad edges, inverted normals, holes, intersecting triangles and overlapping triangles.
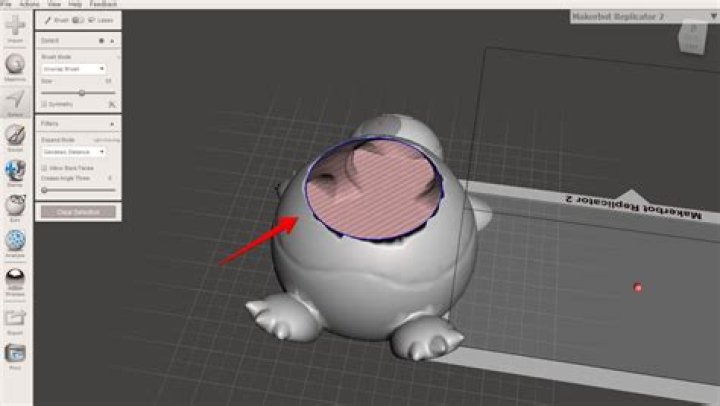
How to separate a part of a mesh in MeshMixer?
Meshmixer offers several ways to separate a part of a mesh. The simplest method is first selecting the part to be separated, then using the Edit → Extract (Shift+D) command. The program will create a new shell with an optional offset distance.
What file formats does MeshMixer support?
For exporting designs to a different format, Meshmixer also supports Collada, VRML, and Smesh. STL (STereoLithography) is a format originally developed for stereolithography 3D printing that is the most commonly accepted file format in 3D printing.
How to create an even tessellation with MeshMixer?
With Meshmixer, you can create an even tessellation using the Remesh command. Click the Select Icon in the menu and click to create an area to be remeshed, or use Ctrl + A to select the entire object. On the Popup menu, click Edit → Remesh or hit R. There are several Remesh Modes:
How do I reduce the file size of a mesh?
Optimizing the mesh reduced the file size by 60%. Meshmixer offers several ways to separate a part of a mesh. The simplest method is first selecting the part to be separated, then using the Edit → Extract (Shift+D) command. The program will create a new shell with an optional offset distance.